ECE 5725 Project :Portable Document Scanner
Designed by
Bochong Chen (bc446) and Jiaxian Chen (jc3459)
Demonstration Video
Introduction
Not every household has a scanner at home, and many scanning apps nowadays require active subscriptions. Therefore, we plan to implement a free-to-use document scanner system that can be easily used at home and carried in pocket. The system will mainly focus on two kinds of functions: document scanning and form filling using Optical Character Recognition (OCR) techniques.
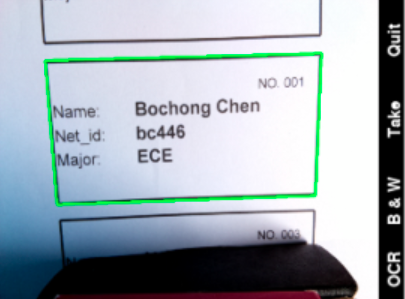
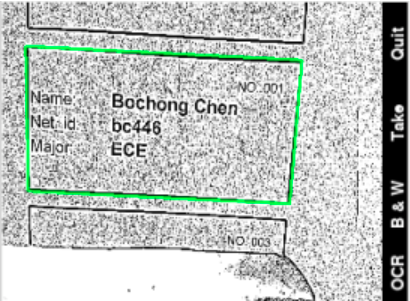
The document scanning will use image processing techniques to detect document-like contours in the camera’s video frames. When a valid document is found, the user can apply a monochrome filter to the document, as well as scan the document. The scanned result will be displayed on the piTFT, and if the user is satisfied with the result document, a simple button click can save the image files to a designated Baidu cloud drive.
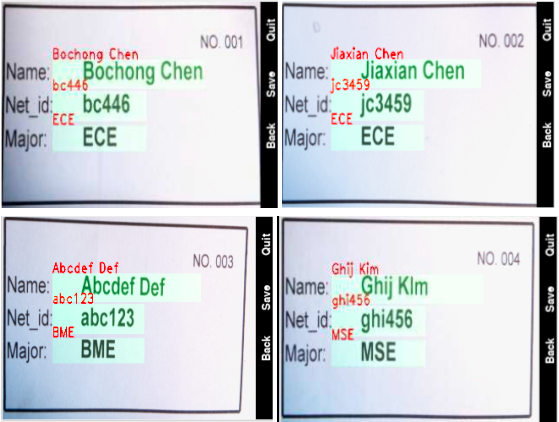
Another functionality is to recognize the texts in a document. This will be helpful when a person needs to record data from forms or receipts. In the first time of use, the user needs to provide a sample document and manually mark the Regions of Interests (ROI). After the configuration, the program can automatically find the document in the viewfinder and perform OCR in each of the ROI. A successful take will be displayed on the piTFT screen, with the recognized characters overlaid on top of the original image. The program can store multiple scans, which is automatically saved in csv files and pushed to the cloud disk.
Designing and Testing
The program allows the user to switch between the scanning mode and OCR mode, take photos, and save results by pressing the four physical buttons located on the right side of the piTFT screen. In order to perform all the functionalities with only four buttons, multiple levels of menu were implemented. The general UI layout looks like the following:
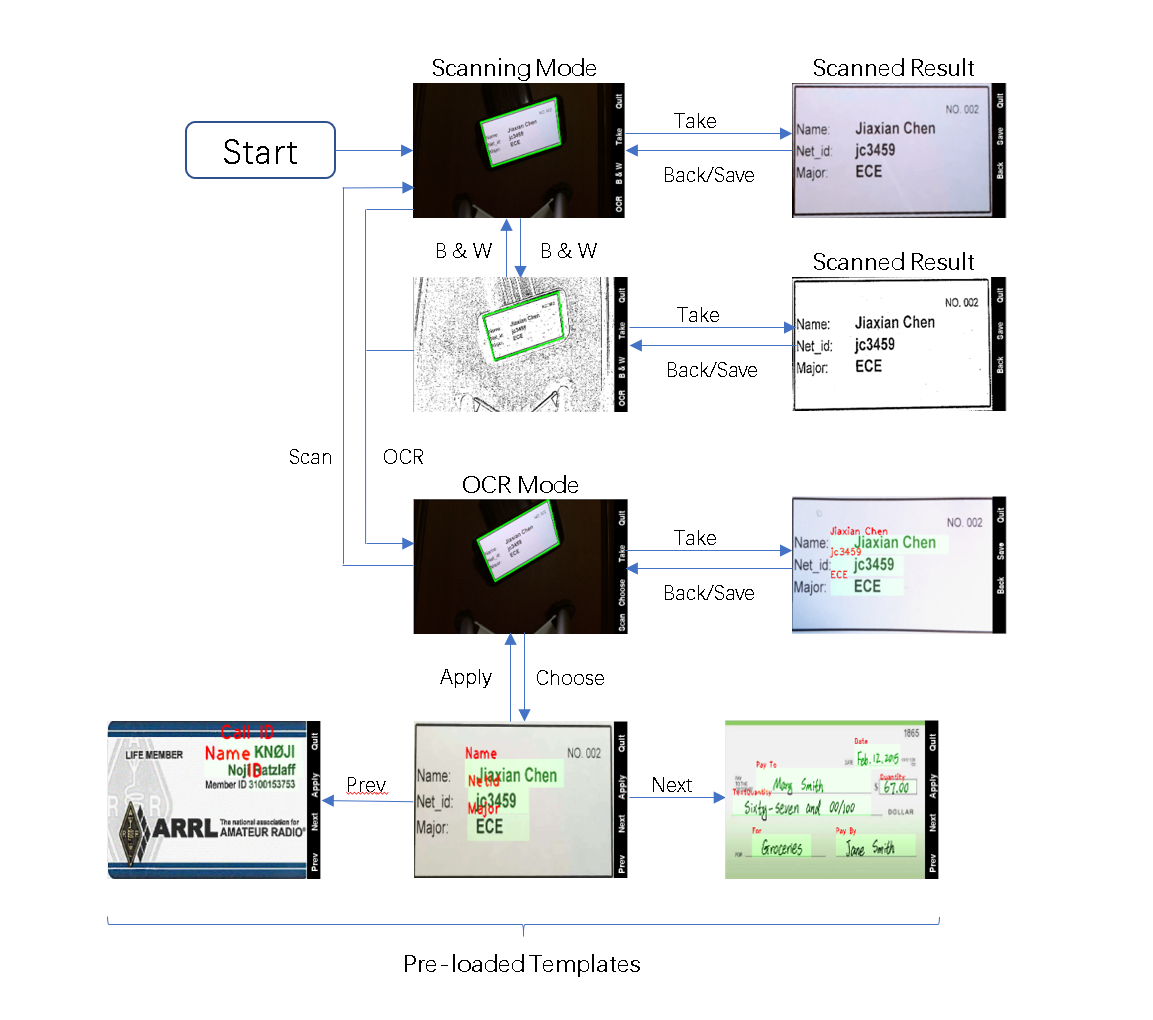
The layout can be abstracted to multiple menu states, and the program can determine its operations based on its current menu state. The states in this program include:
- SCAN: Scanning mode. The program is detecting document-like shapes in the viewfinder, marking them on the screen.
- SCAN_TAKE: A scan action is initiated. The program processes and generates a scanned document frame.
- SCAN_TAKEN: Scan action is completed. The program only needs to display the result generated in SCAN_TAKE and be ready for document uploading.
- OCR: OCR mode: The program does the same as in the scanning mode.
- OCR_TAKE: An OCR action is initiated. The program processes and generates an OCR result.
- OCR_TAKEN: OCR action is completed. The program only needs to display the result generated in OCR_TAKEN and be ready for document uploading.

Scanning and OCR Pipeline:
Obtaining Scanning Frames:
The document scanning frame is where all the contours are detected and displayed. To produce it, the program goes through the following pipeline:
- Obtain a video frame from OpenCV VideoCapture.
- Make a copy of its monochrome version so that edge detection can be performed.
- Apply gaussian blur to remove high frequency noises and avoid finding contours of the noises.
- Perform Canny function to obtain an image of the edges.
- Perform cv2.findContours() to identify all contoured areas.
- Perform cv2.approxPolyDP() on each contour to obtain the shape information, picking the largest one with four vertices (document shaped).
- If a rectangle is found, overlay the original image with the rectangle edges, otherwise, overlay all the detected contours so that the user can adjust the camera.
- Depending on the display mode (color/B&W), apply adaptive thresholding to create a black and white frame.
Scanning a document:
If the user presses the “take” button on the screen. The program will do the following to obtain a scanned document:
- Repeat the above procedure to obtain a frame with the largest rectangular contour.
- If the contour is present, perform a perspective transform to produce the bird’s-eye view of the document; otherwise, return the frame of the straightened document and wait for the next main loop iteration.
- If in B & W mode, perform an adaptive thresholding to provide a clear black and white view.
- Return the new frame


Performing OCR on a document:
This action is performed when the user clicked “take” under OCR mode. Unlike the scanning mode, which relies on contour detection, the OCR mode relies on ORB feature matching. ORB (Oriented FAST and Rotated BRIEF) is an image processing algorithm that extracts feature keypoints from an image. Since the user is required to upload a sample picture of the document before using OCR, the program already knows what the target looks like. When a real-world picture is taken, the program can compare and match the ORB keypoints of the real-world picture and the sample picture. If the match is good enough, the program can then directly locate the target document.
This is considered to be more robust than the contour-finding method, because the feature matching can still function properly when the document doesn’t have all the corners in the view, or when the document is not rectangle-shaped.
After the ORB matching, because the target object is located and perspective transformed, it is now aligned exactly like the sample picture. The program can then crop out each region of interest and run Tesseract OCR algorithm on each separately.
The OCR pipeline goes as follow:
- Obtain a frame from VideoCaputure.
- Perform ORB keypoint detection on the frame.
- Match its keypoints with the sample’s keypoints (statically computed)
- Perform cv2.findHomography() to obtain the perspective transform matrix.
- Perform perspective transform to obtain the bird’s-eye view of the target.
- Crop out each ROI, run Tesseract OCR on each of them.
- Overlay the algorithm results(ROI and characters recognized) on the original image.
- Return the new frame.
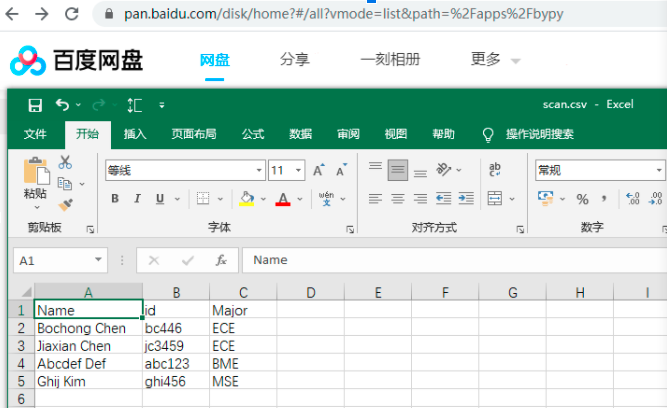
Storing results to the cloud:
After a document scan or an OCR scan, the user can choose to save the results to their designated cloud disk (currently implemented on Baidu cloud disk only). The program uses the bypy library, which is a tool that allows users to programmatically upload files to the Baidu cloud disk. When the user presses “Save” button, the program generates a jpg image or a csv file, depending on the operation mode, and upload them to the Baidu cloud disk by running “os.system(‘bypy upload XXX’). The following shows a sample csv file uploaded to the cloud disk:
Issues:
We encountered several problems during the development, and through online researching as well as trial & error, we managed to resolve most of them and brought a properly functional prototype to the demo.
1. The first issue was the video frame acquisition. That is, the camera has a resolution lower than we expected. Although later we realized that the resolution can be turned up with cap.set(), the resolution boost came with a significant sacrifice on frame rate. Reading the documents, we realized that the problem did not originate from the pi camera’s hardware side but from the receiving side. We wanted to use multiprocessing to save time in decoding the frames, but we quickly found out that the pi camera firmware was not designed to be handled by multiple processes. Although multiprocessing is still possible by sharing the same camera instance among different processes, implementing it can be challenging and we decided it wasn’t worthy for our efforts.
Instead of multiprocessing, we used a multi-threading approach. We created a threaded class that constantly read frames from VideoCapture and constantly replace its frame attribute with the newest one. When the main loop asks for a frame, it will always get one instantly, except for the fact that it may not be the most up-to-date frame. However, using this method, we managed to bring the framerate to an acceptable level running at 1024 x 768.
2. Another issue we encountered was the environment setup. The issue is that Python usually works in a project-based and isolated environment. That is typically considered a good practice because it can prevent version conflict with other projects on the same computer. However, when running “sudo python3 code.py” (sudo is needed to display the screen on piTFT), the environment was changed because of the sudo privilege. Our bypy and pytessearct libraries failed because of this. Particularly, because the pytessearct module is included in Pillow, pip somehow failed to recognize the module isn’t actually installed.
After some searching, we found that the environment can actually be preserved by adding “-E” flag to the sudo command. (e.g. sudo -E python3 code.py). Therefore, we were able to run our system fully on the piTFT screen. And we reinstalled the bypy library in the sudo environment to eliminate the error.
Result
As far as we are concerned, we managed to stay on schedule for the entire development stage. In our project proposal, we outlined the goal to implement a system that can scan documents, perform automated form processing, save results to a designated space, and interact with users using a multi-level menu. At the demo session, we managed to demonstrate all the functionalities that were proposed.
Conclusions
As discussed above, we have achieved what we proposed and created a functional prototype of the portable scanning system. The system can be carried easily, and the file sharing process is simple and automated. Our initial ideas have shown to be practical in real-world systems.
Future Work
If we had more time, we would love to add a lighting control component to the system, so that the system can automatically adjust lighting, contrast, and exposure, etc., to achieve better results in more diverse environments (e.g in a dark environment). At the current stage, although the ORB algorithm is more powerful than the contour detection, it can potentially fail to identify the target because of some discrepancies between the sample and the actual target. We look forward to researching more on improving the accuracy and artifact rejection of this algorithm.
Work Distribution
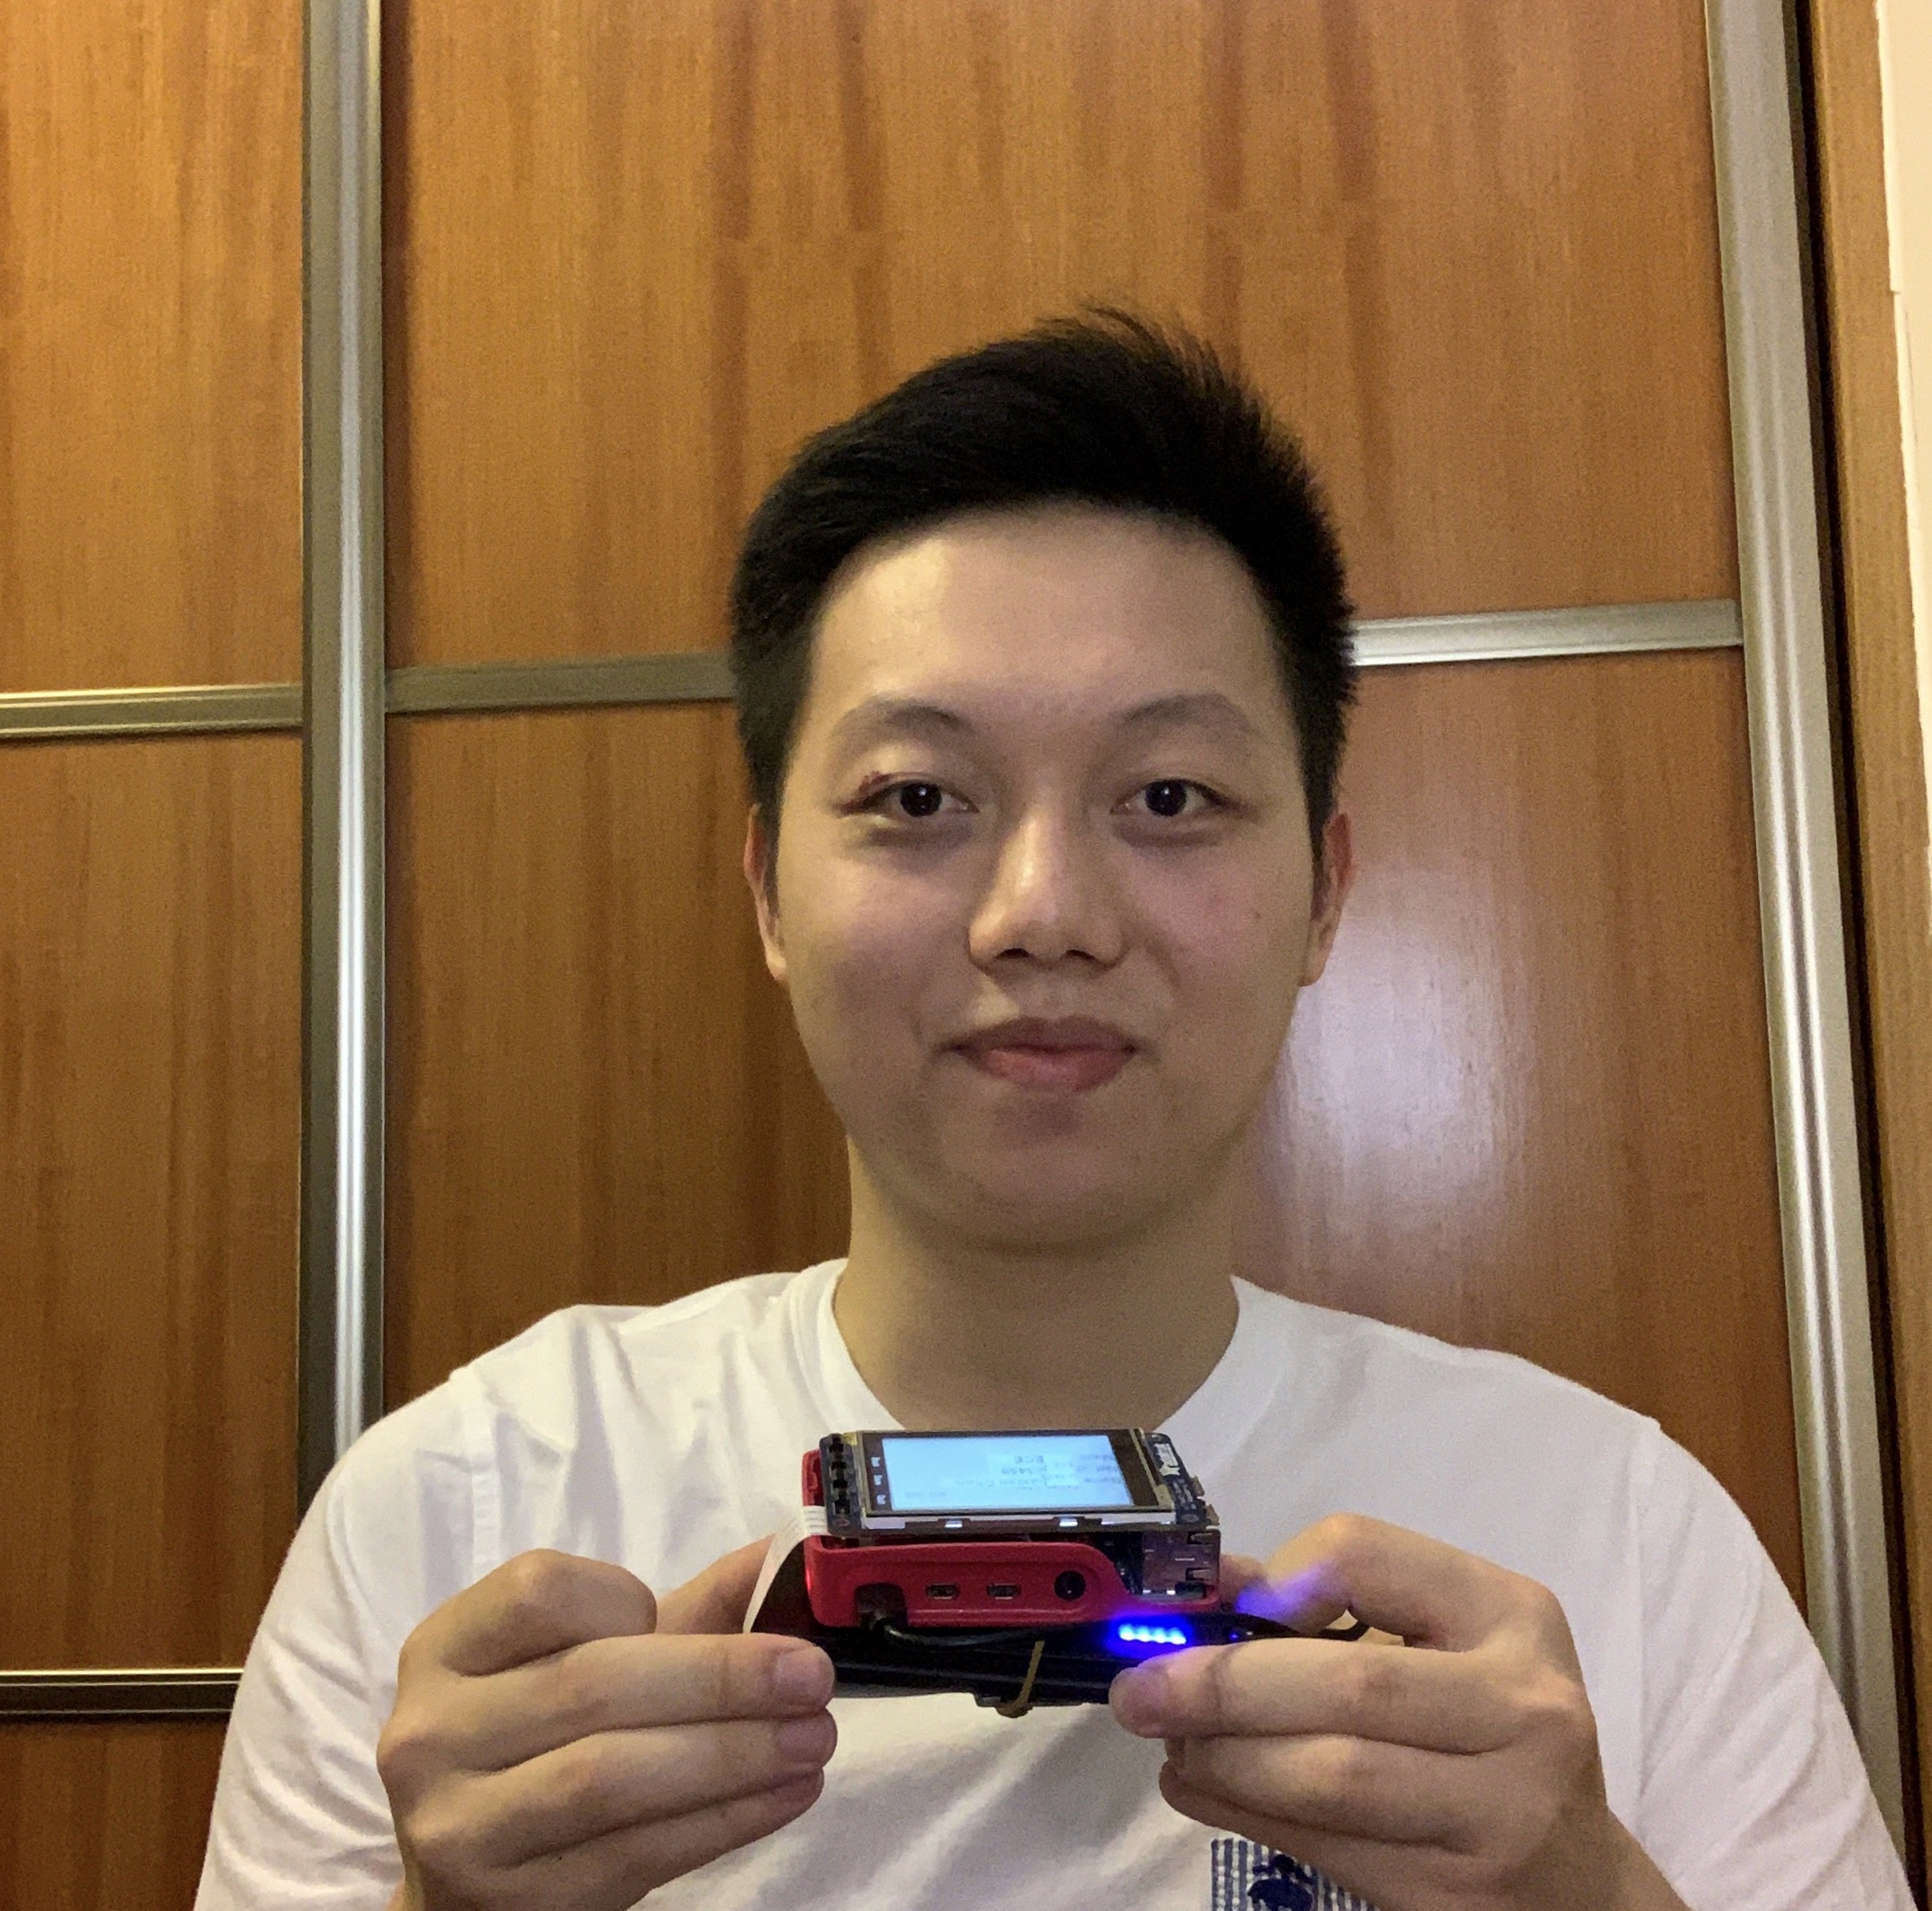
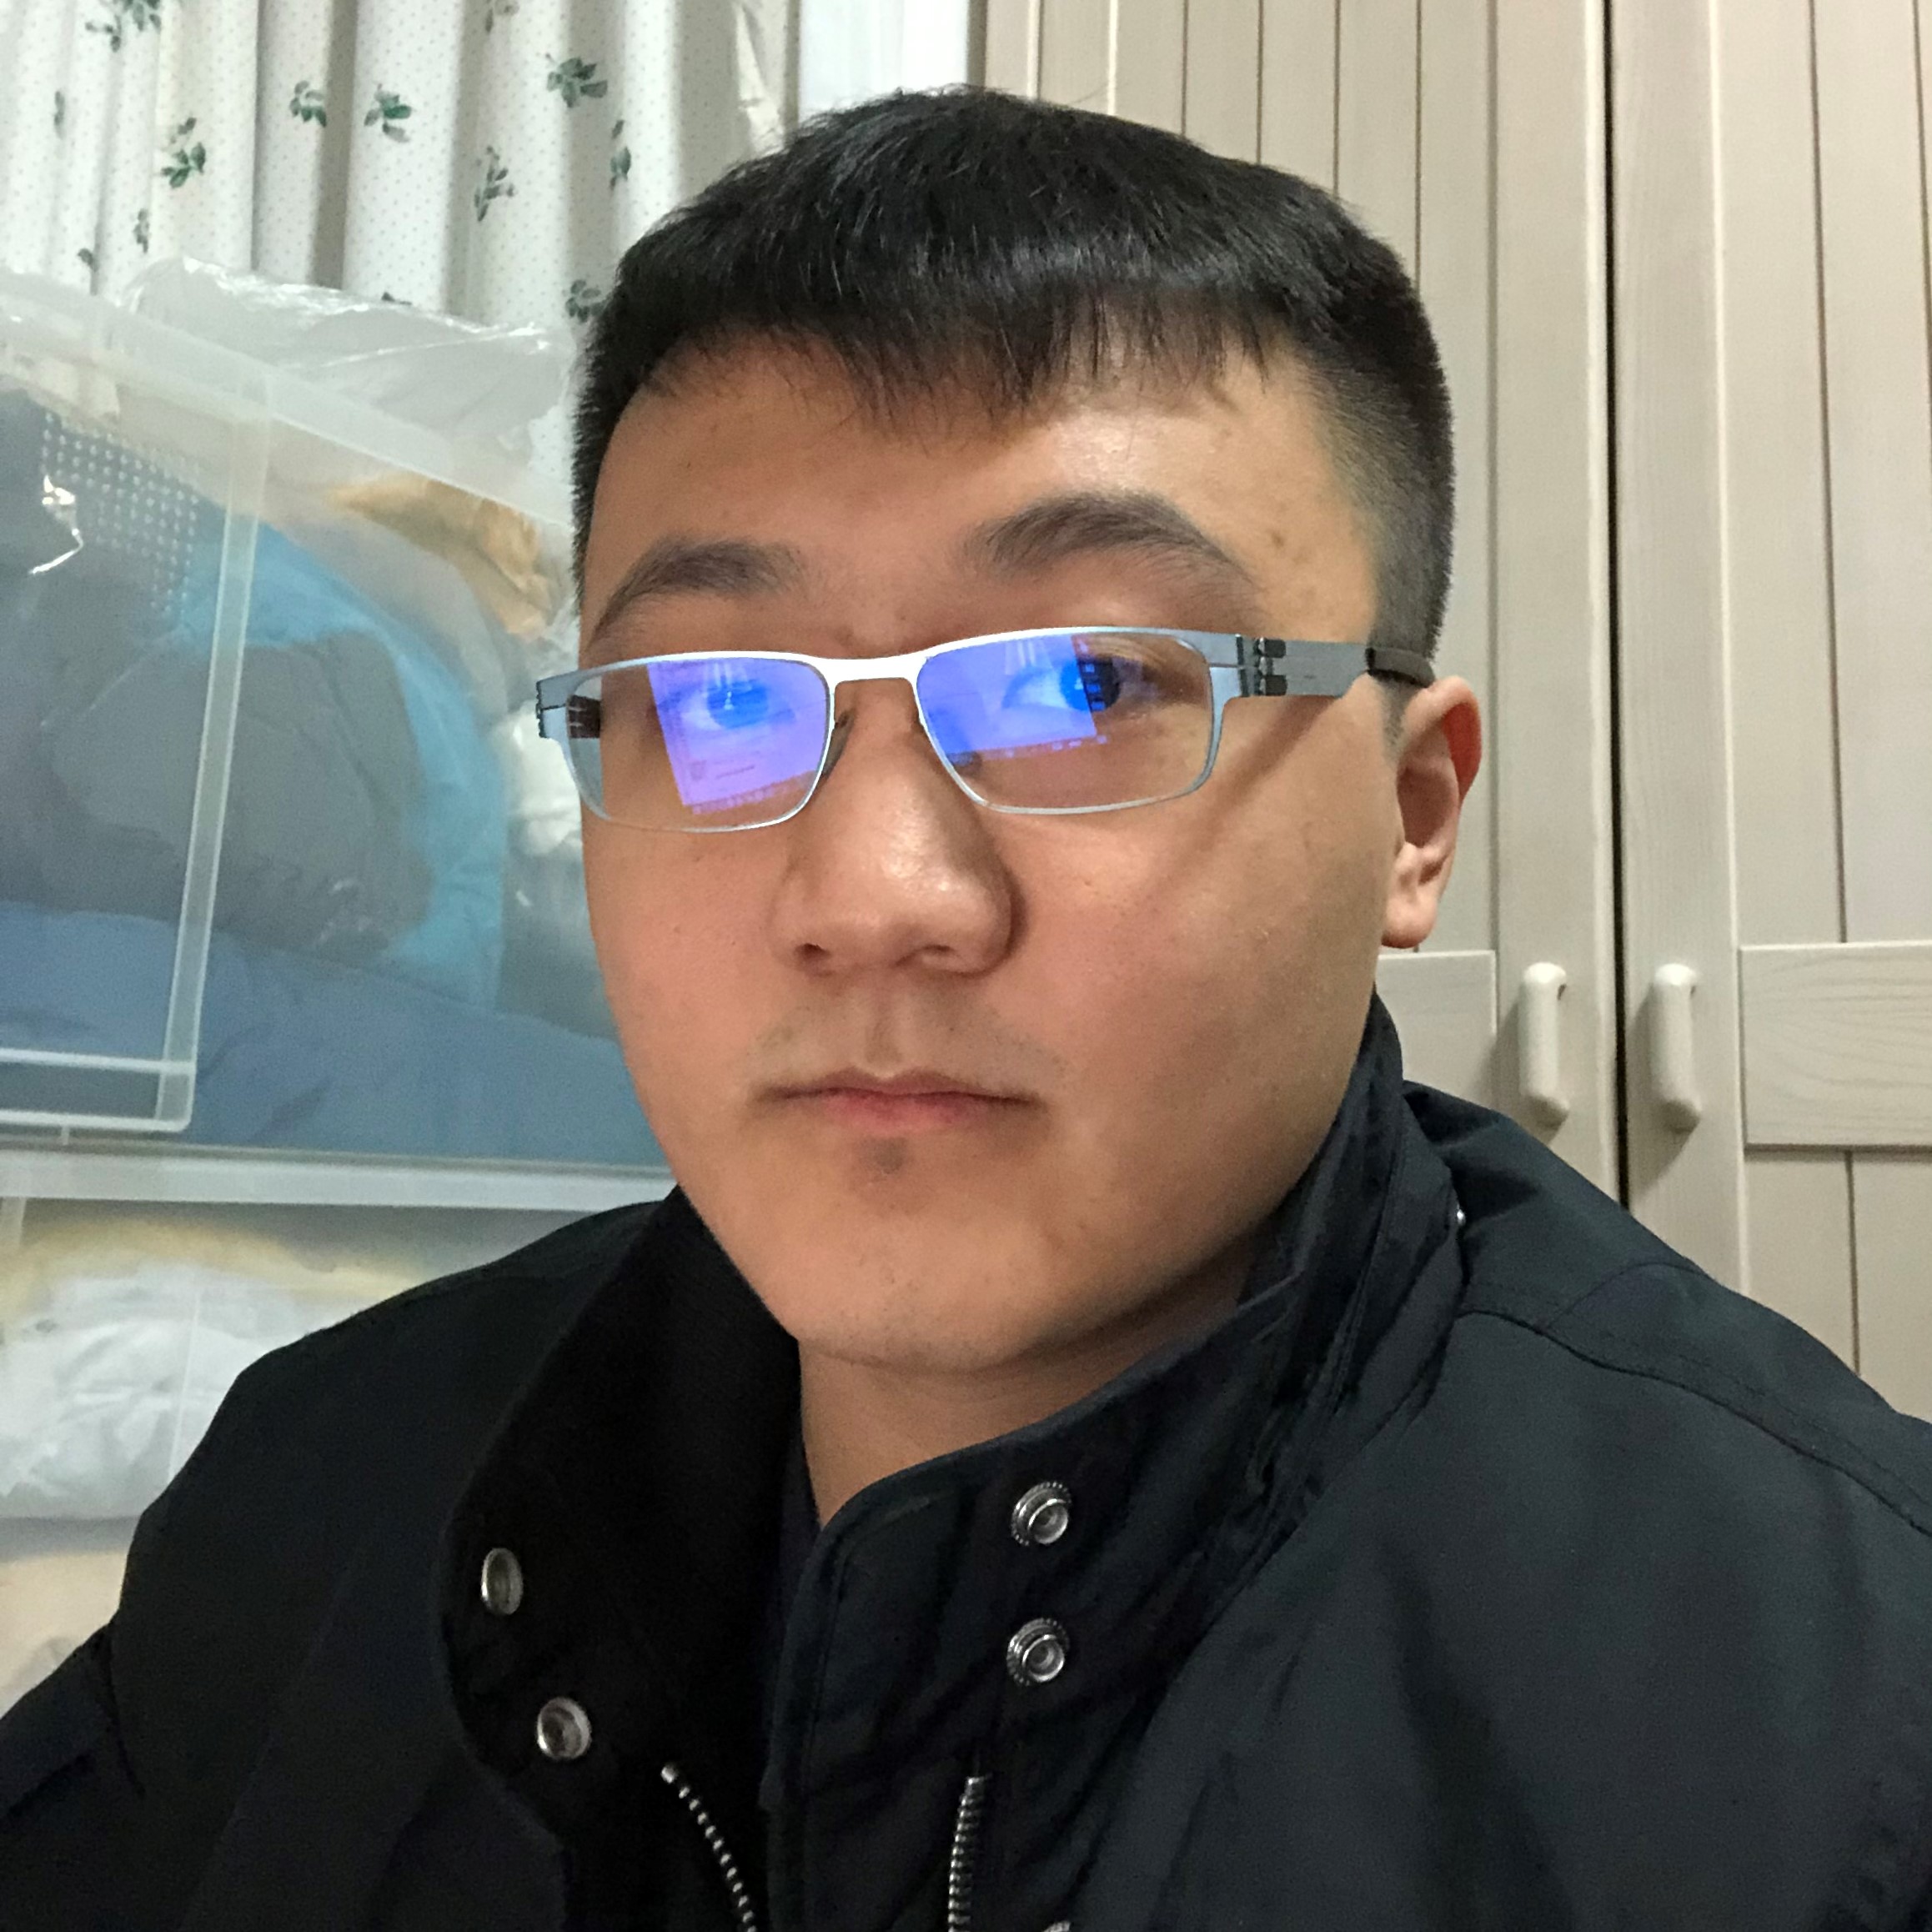
Project group picture
Jiaxian Chen
jc3459@cornell.edu
Designed the scanning section.
Bochong Chen
bc446@cornell.edu
Designed the OCR section.
Parts List
- Raspberry Pi Model 4B $35.00
- Raspberry Pi Camera V2 $25.00
- RPi UPS, $20
- 2* 18650 Lithium-ion Batteries, $2
Total: $82
References
Edge Detection with OpenCVEdge Detection in Opencv 4.0
How to Build a Kick-Ass Mobile Document Scanner
Feature Based Image Alignment using OpenCV (C++/Python)
A comprehensive guide to OCR with Tesseract, OpenCV and Python
bypy library
Code Appendix
final.py:
// final.py
import csv
import os
import pickle
import sys
from datetime import datetime

import RPi.GPIO as GPIO
import cv2
import numpy as np
import pygame
import pytesseract

from menu import Menu
from utils import find_biggest, sort_corners, draw_rectangle
from video_stream import VideoStream

# global variables
btn_lock = False
pressed_btn = None
curr_state = Menu.SCAN
menu_lst = [['OCR', 'B & W', 'Take', 'Quit'],
            ['   ', 'Back', 'Save', 'Quit'],
            ['Scan', 'Choose', 'Take', 'Quit'],
            ['Prev', 'Next', 'Apply', 'Quit']]
curr_menu = menu_lst[0]
thresholding = False
take_done = False
main_frame = np.zeros((240, 320, 3))
stream = VideoStream()

# find all the available OCR samples
ocr_filename = []
for filepath in os.listdir("ocr_data"):
    if filepath.endswith('.pkl'):
        ocr_filename.append(filepath.replace(".pkl", ""))
ocr_index = 0
my_data = []

# pre-load the ORB keypoint samples to save time
ocr_sample = cv2.imread(f'ocr_data/{ocr_filename[ocr_index]}.jpg')
ocr_roi = pickle.load(open(f'ocr_data/{ocr_filename[ocr_index]}.pkl', 'rb'))
orb = cv2.ORB_create(1000)
kp1, des1 = orb.detectAndCompute(ocr_sample, None)
bf = cv2.BFMatcher(cv2.NORM_HAMMING)


# convert a OpenCV frame to a pygame compatible one
def cvt2pygame(frame):
    frame = cv2.cvtColor(np.float32(frame), cv2.COLOR_BGR2RGB)
    frame = cv2.resize(frame, (300, 240))  # resize to screen size
    frame = cv2.flip(frame, 1)  # horizontal flip
    frame = cv2.rotate(frame, cv2.cv2.ROTATE_90_COUNTERCLOCKWISE)
    return pygame.surfarray.make_surface(frame)


# interrupt callback function upon button pressed
def button_press_callback(channel):
    global btn_lock, pressed_btn
    if not btn_lock:
        pressed_btn = channel


# change menu state according to the pressed button
def change_state():
    global pressed_btn, curr_state, curr_menu, thresholding, \
        take_done, my_data, ocr_sample, ocr_roi, ocr_index, ocr_filename

    if curr_state == Menu.SCAN:
        if pressed_btn == 22:
            curr_state = Menu.SCAN_TAKE
        elif pressed_btn == 23:
            thresholding = not thresholding
        elif pressed_btn == 27:
            # change back to color mode before going to OCR mode
            thresholding = False
            curr_state = Menu.OCR
            curr_menu = menu_lst[2]
    elif curr_state == Menu.SCAN_TAKE:
        if take_done:  # check if the take action has already finished
            take_done = False
            curr_state = Menu.SCAN_TAKEN
            curr_menu = menu_lst[1]
    elif curr_state == Menu.SCAN_TAKEN:
        if pressed_btn == 22:
            curr_state = Menu.SCAN
            curr_menu = menu_lst[0]
            # save scan results
            time = datetime.now()
            filename = f'saved_data/scanned_document_{str(time.date())}_{time.hour}_{time.minute}_{time.second}.jpg'
            cv2.imwrite(filename, main_frame)
            os.system(f'bypy upload {filename}')
        elif pressed_btn == 23:
            curr_state = Menu.SCAN
            curr_menu = menu_lst[0]
    elif curr_state == Menu.OCR:
        if pressed_btn == 22:
            curr_state = Menu.OCR_TAKE
        elif pressed_btn == 23:
            curr_state = Menu.OCR_CHOOSE
            curr_menu = menu_lst[3]
        elif pressed_btn == 27:
            curr_state = Menu.SCAN
            curr_menu = menu_lst[0]
    elif curr_state == Menu.OCR_TAKE:
        if take_done:  # check if the take action has already finished
            take_done = False
            curr_state = Menu.OCR_TAKEN
            curr_menu = menu_lst[1]
    elif curr_state == Menu.OCR_TAKEN:
        if pressed_btn == 22:
            curr_state = Menu.OCR
            curr_menu = menu_lst[2]
            # save OCR results
            time = datetime.now()
            filename = f'saved_data/ocr_document_{str(time.date())}_{time.hour}_{time.minute}_{time.second}.csv'
            with open(filename, 'w', newline='') as csvfile:
                csv_writer = csv.writer(csvfile)
                csv_writer.writerow([i[3] for i in ocr_roi])
                csv_writer.writerow(my_data)
            os.system(f'bypy upload {filename}')
        elif pressed_btn == 23:
            curr_state = Menu.OCR
            curr_menu = menu_lst[2]
    elif curr_state == Menu.OCR_CHOOSE:
        if pressed_btn == 22:
            curr_state = Menu.OCR
            curr_menu = menu_lst[2]
        elif pressed_btn == 23:
            # switch the OCR sample to the next available
            if ocr_index < len(ocr_filename) - 1:
                ocr_index += 1
                ocr_sample = cv2.imread(f'ocr_data/{ocr_filename[ocr_index]}.jpg')
                ocr_roi = pickle.load(open(f'ocr_data/{ocr_filename[ocr_index]}.pkl', 'rb'))
        elif pressed_btn == 27:
            # switch the OCR sample to the previous available
            if ocr_index > 0:
                ocr_index -= 1
                ocr_sample = cv2.imread(f'ocr_data/{ocr_filename[ocr_index]}.jpg')
                ocr_roi = pickle.load(open(f'ocr_data/{ocr_filename[ocr_index]}.pkl', 'rb'))

    # state change is finished, erase pressed_btn
    pressed_btn = None


# obtain frame depending on menu state
def get_frame():
    global main_frame, curr_state

    if curr_state == Menu.SCAN or curr_state == Menu.OCR:
        main_frame, success = get_scanning_frame(False)
    elif curr_state == Menu.SCAN_TAKE:
        main_frame, success = get_scanning_frame(True)
    elif curr_state == Menu.OCR_TAKE:
        main_frame, myData = get_ocr_frame()
    elif curr_state == Menu.SCAN_TAKEN or curr_state == Menu.OCR_TAKEN:
        pass
    elif curr_state == Menu.OCR_CHOOSE:
        main_frame = get_ocr_sample_frame()


# load the sample picture and overlay the fields
def get_ocr_sample_frame():
    img_show = ocr_sample.copy()
    img_mask = np.zeros_like(img_show)

    for x, r in enumerate(ocr_roi):
        cv2.rectangle(img_mask, r[0], r[1], (0, 255, 0), cv2.FILLED)
        img_show = cv2.addWeighted(img_show, 0.99, img_mask, 0.1, 0)  # overlay ROI rectangles
        cv2.putText(img_show, r[3], r[0], cv2.FONT_HERSHEY_PLAIN, 3, (0, 0, 255), 3)  # overlay field text

    return img_show


# acquire a scanning preview or result frame
def get_scanning_frame(get_result=False):
    global stream, thresholding, take_done

    img = stream.read().copy()
    img_gray = cv2.cvtColor(img, cv2.COLOR_BGR2GRAY)  # turn gray for later edge detection
    img_blur = cv2.GaussianBlur(img_gray, (5, 5), 1)  # blur to remove high frequency noises
    img_threshold = cv2.Canny(img_blur, 100, 150)  # get picture with edges only
    kernel = np.ones((5, 5))
    img_dial = cv2.dilate(img_threshold, kernel, iterations=2)
    img_threshold = cv2.erode(img_dial, kernel, iterations=1)

    contours, _ = cv2.findContours(img_threshold, cv2.RETR_EXTERNAL, cv2.CHAIN_APPROX_SIMPLE)  # find closed contours
    biggest, maxArea = find_biggest(contours)  # find the biggest contour with 4 sides

    if get_result and biggest.size != 0:  # this means the program wants the scanned result
        biggest = sort_corners(biggest)
        pts1 = np.float32(biggest)
        pts2 = np.float32(
            [[0, 0], [img.shape[1], 0], [0, img.shape[0]], [img.shape[1], img.shape[0]]])
        matrix = cv2.getPerspectiveTransform(pts1, pts2)
        img = cv2.warpPerspective(img, matrix, (img.shape[1], img.shape[0]))  # perform perspective transform

        if thresholding:
            # apply adaptive thresholding
            img = cv2.cvtColor(img, cv2.COLOR_BGR2GRAY)
            img = cv2.adaptiveThreshold(img, 255, cv2.ADAPTIVE_THRESH_GAUSSIAN_C, cv2.THRESH_BINARY, 11, 2)

        take_done = True
        return img, True

    else:  # this means the program just want a preview frame
        if thresholding:
            # apply adaptive thresholding
            img = cv2.cvtColor(img, cv2.COLOR_BGR2GRAY)
            img = cv2.adaptiveThreshold(img, 255, cv2.ADAPTIVE_THRESH_GAUSSIAN_C, cv2.THRESH_BINARY, 11, 2)
            img = cv2.cvtColor(img, cv2.COLOR_GRAY2BGR)

        if biggest.size == 0:
            cv2.drawContours(img, contours, -1, (0, 255, 0), 5)
        else:
            biggest = sort_corners(biggest)
            img = draw_rectangle(img, biggest, 5)

        return img, False


def get_ocr_frame():
    global stream, take_done, ocr_sample, ocr_roi, orb, kp1, des1, bf, my_data

    # ORB is still not robust enough
    # for now, perform document detection first, then ORB
    img, success = get_scanning_frame(True)
    while not success:
        img, success = get_scanning_frame(True)

    img = stream.read().copy()

    kp2, des2 = orb.detectAndCompute(img, None)

    matches = bf.match(des2, des1)
    matches.sort(key=lambda x: x.distance)
    good_matches = matches[:int(len(matches) * 0.25)]

    src_points = np.float32([kp2[m.queryIdx].pt for m in good_matches]).reshape(-1, 1, 2)
    dest_points = np.float32([kp1[m.trainIdx].pt for m in good_matches]).reshape(-1, 1, 2)
    M, _ = cv2.findHomography(src_points, dest_points, cv2.RANSAC, 5.0)
    img_scan = cv2.warpPerspective(img, M, (ocr_sample.shape[1], ocr_sample.shape[0]))

    img_scan = cv2.resize(img_scan, (ocr_sample.shape[1], ocr_sample.shape[0]))
    img_show = img_scan.copy()
    img_mask = np.zeros_like(img_show)

    my_data = []

    for x, r in enumerate(ocr_roi):
        cv2.rectangle(img_mask, r[0], r[1], (0, 255, 0), cv2.FILLED)
        img_show = cv2.addWeighted(img_show, 0.99, img_mask, 0.1, 0)

        img_crop = img_scan[r[0][1]: r[1][1], r[0][0]: r[1][0]]

        if r[2] == 'text':
            my_data.append(pytesseract.image_to_string(img_crop)
                           .replace("\x0c", "").replace("\n", ""))
        elif r[2] == 'box':
            imgGray = cv2.cvtColor(img_crop, cv2.COLOR_BGR2GRAY)
            imgThreshold = cv2.threshold(imgGray, 170, 255, cv2.THRESH_BINARY_INV)[1]
            isChecked = cv2.countNonZero(imgThreshold) > 0.5 * imgGray.shape[0] * imgGray.shape[1]
            my_data.append(isChecked)
        cv2.putText(img_show, str(my_data[x]), r[0], cv2.FONT_HERSHEY_PLAIN, 3, (0, 0, 255), 3)
    print(my_data)
    take_done = True
    return img_show, my_data


# main loop
def main():
    global btn_lock, pressed_btn, curr_state, stream, main_frame, curr_menu

    # os.putenv('SDL_VIDEODRIVER', 'fbcon')  # Display on piTFT
    # os.putenv('SDL_FBDEV', '/dev/fb1')  #
    # os.putenv('SDL_MOUSEDRV', 'TSLIB')  # Track mouse clicks on piTFT
    # os.putenv('SDL_MOUSEDEV', '/dev/input/touchscreen')

    btn_pins = [17, 22, 23, 27]
    GPIO.setmode(GPIO.BCM)
    GPIO.setup(btn_pins, GPIO.IN, pull_up_down=GPIO.PUD_UP)

    WHITE = (255, 255, 255)
    BLACK = (0, 0, 0)
    text_pos = [(305, 200), (305, 140), (305, 80), (305, 20)]

    pygame.init()
    pygame.mouse.set_visible(False)
    screen = pygame.display.set_mode((320, 240))
    screen.fill(BLACK)
    font = pygame.font.Font(None, 20)

    for btn_pin in btn_pins:  # bind button press events
        GPIO.add_event_detect(btn_pin, GPIO.FALLING, callback=button_press_callback, bouncetime=300)

    stream.start()

    pytesseract.pytesseract.tesseract_cmd = "/usr/bin/tesseract"

    try:
        while True:
            for event in pygame.event.get():
                if event.type == pygame.QUIT:
                    sys.exit()

            btn_lock = True
            if pressed_btn == 17:
                sys.exit()
            change_state()
            btn_lock = False

            get_frame()

            screen.fill(BLACK)
            screen.blit(cvt2pygame(main_frame), (0, 0))
            for i in range(4):
                text = font.render(curr_menu[i], True, WHITE)
                text = pygame.transform.rotate(text, 90)
                screen.blit(text, text_pos[i])

            pygame.display.flip()

    finally:
        print("Program finished")
        stream.cleanup()
        cv2.destroyAllWindows()
        pygame.quit()


if __name__ == "__main__":
    main()
menu.py:
from enum import Enum, unique
@unique
class Menu(Enum):
    SCAN = 1
    SCAN_TAKE = 2
    SCAN_TAKEN = 3
    OCR = 4
    OCR_TAKE = 5
    OCR_TAKEN = 6
    OCR_CHOOSE = 7
utils:
import cv2
import numpy as np


def sort_corners(myPoints):
    myPoints = myPoints.reshape((4, 2))
    myPointsNew = np.zeros((4, 1, 2), dtype=np.int32)
    add = myPoints.sum(1)

    myPointsNew[0] = myPoints[np.argmin(add)]
    myPointsNew[3] = myPoints[np.argmax(add)]
    diff = np.diff(myPoints, axis=1)
    myPointsNew[1] = myPoints[np.argmin(diff)]
    myPointsNew[2] = myPoints[np.argmax(diff)]

    return myPointsNew


def find_biggest(contours):
    biggest = np.array([])
    max_area = 0
    for i in contours:
        area = cv2.contourArea(i)
        if area > 5000:
            peri = cv2.arcLength(i, True)
            approx = cv2.approxPolyDP(i, 0.02 * peri, True)
            if area > max_area and len(approx) == 4:
                biggest = approx
                max_area = area
    return biggest, max_area


def draw_rectangle(img, biggest, thickness):
    cv2.line(img, (biggest[0][0][0], biggest[0][0][1]), (biggest[1][0][0], biggest[1][0][1]), (0, 255, 0), thickness)
    cv2.line(img, (biggest[0][0][0], biggest[0][0][1]), (biggest[2][0][0], biggest[2][0][1]), (0, 255, 0), thickness)
    cv2.line(img, (biggest[3][0][0], biggest[3][0][1]), (biggest[2][0][0], biggest[2][0][1]), (0, 255, 0), thickness)
    cv2.line(img, (biggest[3][0][0], biggest[3][0][1]), (biggest[1][0][0], biggest[1][0][1]), (0, 255, 0), thickness)

    return img
videostream.py:
                import cv2.cv2
import numpy as np


class VideoStream:
    def __init__(self):
        self.cap = cv2.VideoCapture(0)
        self.cap.set(cv2.cv2.CAP_PROP_FRAME_WIDTH, 1024)
        self.cap.set(cv2.cv2.CAP_PROP_FRAME_HEIGHT, 576)
        self.stopped = False
        self.frame = np.zeros((576, 1024, 3), np.uint8)

    def start(self):
        t = Thread(target=self.update, args=())
        t.daemon = True
        t.start()
        return self

    def update(self):
        while True:
            if self.stopped:
                return

            ret, new_frame = self.cap.read()
            if not ret:
                self.stop()
                return
            self.frame = new_frame

    def read(self):
        return self.frame

    def stop(self):
        self.stopped = True

    def cleanup(self):
        self.cap.release()